Tuesday, April 24, 2007

a plain shirt, transformed


I bought a few large button down shirts at the Salvation Army last fall. I had just gotten my new sewing machine and I had the idea to take the shirts apart, embellish them. . .just play around with them. I never got to it, like a lot of my projects.


Yesterday, after I couldn't take the heat in the garden any longer (it was 90 degrees in the sun here!)


I came inside and went a bit sewing crazy. I made two raw silk pillowcases. Those are quite elegant, but not interesting enough to post. I also did a bit of crocheting and some sock knitting yesterday. I had one heck of great day off!

The shirt project is great fun. It's not over yet, but I'd like to share my work in progress with you.

I'm going to slit the sides, for the shirt is quite unflattering and probably will hang better with open side seams. It also needs cuffs. I can't decide whether I want to put buttons on it or not. Perhaps I'll put ties on it if I think it needs something to close it with. I ripped a long piece of the same checked fabric for a head wrap: Wearing this shirt with a head wrap made me feel like Lucy Ricardo, and I wish I had these gingham checked espadrilles I saw on line to match the outfit!

working on the chambray shirt


First, I put pockets on the front. I just had to cover up the little logo.


Then, I cut off the cuffs.


I put a new collar right over the old one.


Lastly, I put on strip of fabric over the button placket and put a big circle on the back.

Sunday, April 22, 2007

finishing the shirt renovation


I sewed on one cuff. I was undecided about it. It seemed too heavy. I went and slit the sides of the shirt and put binding on them, creating more of the smock look I was aiming for. Meanwhile, the one cuff stayed on. . .


. . .but today I cut it right off. I found a few scraps of another handspun blue plaid and I got all excited!


I put the half circles over the remainder of the original shirt's sleeve button placket. Then I put binding over the raw edge.

A few more finishing touches and the shirt is done. I might put a big button at the neckline but I'm not sure yet. If I do, it'll be a button made from the blue and white checked fabric. Here's the shirt:

look ma! no cable needles!

As promised, here are instructions for knitting cables without cable needles. I'll show you the basics. You can figure out all the other permutations. I sometimes use the needles to move the stitches from one needle to the other. Other times I just use my fingers. It depends on the yarn and it depends on my mood. It doesn't make one bit of difference how you do it. Find what way works best for you and if it works out, if the stitches look nice and even, you're doing it correctly. There is no one "right way"!

Please leave a comment if you want more pictures or explanations.

right twist


Okay. Here we go! Just a simple four stitch cable to start out with. Let the stitches you want to manipulate come off the needles. I guarantee you, they're not going anywhere. This is NOT as scary as the first time you cut a steek! So, go ahead and let them stitches hang!


Transfer the first two stiches to the left hand needle. This is the same as "hold two stitches in back".


Transfer the remaining two stiches to the left hand needle and knit them off.


All done!

Saturday, April 21, 2007

left twist


Take all the stitches for the cable off the needle.


Next, put the the last two stitches on the right hand needle. Then, put the first two stitches on the left hand needle. This is the same as "hold two sts in front".Lastly, transfer the stitches from the right hand needle to the left hand needle and you're. . .


. . . ready to knit the stitches off!


You've made a left leaning cable without a cable needle!

Friday, April 20, 2007

a well loved sweater


This is a Classic Elite Pattern I made years ago. I used to not wear it much 'cause it is NOT flattering on my body, but this year I decided "so what?" and started wearing it. . .too much. The original pattern calls for white cotton, but I was afraid of getting it dirty, which is reasonable enough; I folded over one sleeve to cover a stain I can't get out. . .

This was a blast to knit. I usually alter patterns, but I couldn't find one fault with this one.

i'm just not sure


I haven't crocheted something since I was around TEN years old! I'm just not sure, as the title says, if I like it. I'm enjoyingcrocheting but. . .the results? Hmmm. What do you think? Be honest.

I believe that I need to dye the yarn in longer spaces for granny squares. Or not. Perhaps I won't make the cardigan I was planning to, but will make instead make a pre-worn looking lap blanket. The single ply lace weight looks rather dull. It has absolutely no sheen.

I wish I could afford some wool/silk!

I can't really believe I'm crocheting. I used to have a serious prejudice against it! Knitting was good. Crocheting was bad. My mother was a crocheter. Perhaps there's a connection, Dr. Freud?

two balls of yarn


Here's the last two balls of yarn I've dyed stacked upon each other. But you can see that, can't you?

ball of yarn


Oops! I forgot to take a picture of my second microwave dyed skein while it was hanging up. I just adore how they look when they're still in a skein!

I'm having a craving for green, the color of leaves, lichen, moss. . .

spring is almost here


This pic doesn't quite capture it 'cause the room looks way brighter in person. Check out how strongly the light shines on the carpet. It was almost fifty degrees at 7:30am! But one look outside the windows shows the truth about Maine: it's ugly before the beginning of May. I was glad for all the snow we've had because it covered the end of winter bleakness.

On a crafts note: the pillows in the corner were made for this crazy sofa I had in my last house. I bought a Roccoco headboard at a thrift shop and nailed it to a platform. Then I covered the platform with the same fabric as the ones on those pillows. The headboard was almost the same green with a floral design. It was wackier than heck. I never took a picture of it! It was great in theory, lousy in practice.

Note the paint swatches in the other corner. One other thing that doesn't show in the photo is that the room needs a paint job!

Tuesday, April 17, 2007

new shoes, old pillow


I just had to post my new shoes. Can you believe they are Dr. Scholl's? These crazy high heels are incredibly comfortable.

No, I'm not getting a kickback from the company.

The pillow in the background needs a cleaning. It's a classic red and green needleturn applique design.

I've got a large "stash" of finished pieces for a quilt top that I started way back in the 1980's!

Once, I took a long train ride where the train broke down in Vermont in the middle of nowhere. I brought my applique project with me. I was perfectly content being delayed, as I was immersed in sewing. I wound up teaching an impromptu class with a few bored co-passengers! It was a wonderful experience.

We were stuck there for SIX lovely quilting hours!

Monday, April 16, 2007

dyeing in the microwave


Never mind the bit of nastiness that the title of this entry may conjure up.

Last night I dyed a skein of wool single ply in the microwave. I can't wait to do it again! Here's what I did: Using one-shot dyes, I made a light paste in a few colors and painted them on the skein. Oops. I forgot to say that I first laid down about 5 pieces of plastic wrap over my work surface. That's important: this is messy.

I had dyed the entire skein a light gray earlier in the day. I really wanted to keep the colors separate and it occurred to me that if I use the microwave I wouldn't have moving water.

After I painted the skein, I poured some fairly thin black over most of it to darken up some areas. I also did this because I actually like to intentionally make some mistake when dying, because I think it's more beautiful when it's more random looking.

I rolled the skein into a sausage-like form and put it in the microwave for 20 minutes. I wasn't sure if I would wind up with a sausage shaped piece of felt when I was done. If so, it would only be six bucks down the drain (or a nice bunch of coasters when cut up. . .hmm. . .that's an interesting idea).

Anway, it came out great (to my eyes)! Try it. It's fun!

PS. The top picture is brighter than it really is. The real color of the wool is about halfway between the two pictures. Again, I need to learn to use my camera! Where's the book that came with it? Does anyone know where it went?

Sunday, April 15, 2007

punto in aria


Punto in Aria means "points in the air". I won't go into the history of it; if you're interested, click on the name.

This is needlemade lace done without a ground fabric (hence: points in the air!) It's a lot of fun 'cause the possibilities are endless. Most designs are geometic or floral, with the emphasis on the former. I created a rather Colonial Americana design because at the time, my house was decorated in that look. I've always meant to do another freeform design like this but have not gotten around to it. Maybe when there's the next big snowstorm (hmmm. . .that could be May. . .better start planning).

when sloppy pays off


Here's some worsted weight yarn I dyed a few weeks ago. The skeins started out as light blues, grays and one pink. The colors in the pic are much brighter than in real life. I ought to learn how to use my digital camera!

I just adore hand dyed wools. I started out many years ago using natural dyes. They produce fantastic subtle colors. I adore the lichens; green stuff that dyes up weird pinks and purples. It's like magic (or alchemy).

Then I went on to using acid dyes; very precise.

And lastly, I went to using Country Colors, not quite Rit, but close. They're not colorfast, for one thing, so I can't spend a day at the beach in a hand dyed turtleneck sweater. This is not a joke. I live in Maine.

Anyway, I just wanted to prove that being sloppy sometimes pays off. At least in my opinion.

Saturday, April 14, 2007

coming soon: knitted cables without needles

I've been in love with knit cables since I first started knitting. In fact, believe it or not, a cabled cardigan was my first project. No scarves for me! In my 40 years of knitting (!) I have only made one scarf and that was two years ago. I sold it a woman who fell in love with it. It was pretty funky looking: it looked like it was made of paper. I don't remember what yarn it was but I wish whoever made it still did.

Anyway, back to cables. That first sweater was beautiful but it looked terrible on. I ripped it apart. It took ten years before that yarn turned into anything wearable. I kept making things and ripping them apart! Patterns were terrible back then and I wasn't ready to design my own.

The thing about cabling is that I've always hated using a cable needle. It slows things down so much. On top of that, as my knitting buddies can attest to, I'm always losing those little needles. One time I dropped one in someone's boot. I'm reminded of that, by her, rather often.

Well, I FINALLY figured out how to do cables without the needles. It's fun. It's easy. It's fast. And I'm going to take some pictures so you can see how to do it, too. There are other explanations on the web, but they seem overly complicated to me, at least what I've seen.

So, don't hold your breath, but I will post some pics soon. Believe me, being freed from cable needles is a wonderful thing!

okay, i'm not always sloppy


I said in an earlier post that my patchwork piecing skills were sloppy. I started this lap quilt a few months ago and am working very slowly on it. Every seam matches up perfectly, thus proving I'm not always imperfect in my piecing. I think the fact that it's a rather hard pattern makes it enough of a challenge for me to be extra careful.

However, the cord in the picture is sloppy. What does one do with cords? I cannot figure it out. They're all over my house: lamp cords, computer cords, stereo cords. . .help!

my craft room


All my life I've wanted a sewing and crafts room. Finally, I have one! I moved into an old eight room house almost two years ago and it took me about a year to set up the room. I was SO happy the day I did it. Folding up my fabric stash was so much fun!

Unfortunately, that project generated a rash of fabric buying sprees. Now, I either need more cubbyholes or to start some big projects!

PS. The white stuff on the window is tape. We were in the middle of having a spate of Cedar Waxwings eating berries off the bushes in the back of the house. I think the berries made them drunk. In one day, I heard at least a dozen birds hit the windows. In the end, even with the tape, we had six deaths. Poor birdies.

Friday, April 13, 2007

cowboy pillow


I love quilting. Unfortunately, I'm rather sloppy at it if I use a sewing machine. My seams hardly ever match up. I think this is because when I am using a sewing machine, I'm more product oriented than process oriented. I had thought this changed when I bought a Janome sewing machine this past summer. It's very quiet, for one thing. I can also set it to sew very slowly, but still, it doesn't seem to change a thing. I'm still a sloppy patchwork quilter. Same goes for any machine sewing. When I'm sewing by hand, I'm as precise as can be, but I just have to use a sewing machine sometimes! And y'know what? I think being okay with not doing something perfectly is a good thing for me.

I've been practicing this in my knitting lately. I'm working on a big cable knit sweater and I made a big mistake in the cabling the other night. It was about 20 rows back. In the past I would have ripped it out without a second thought. This time, I looked at it for a long time and decided to leave it. It's right at the arm hole and won't be that noticeable. And it'll be a test for me to not point it out to people.

By the way, this "cowboy pillow" is so totally unlike anything I would usually make. I think it was inspired by my friend Lisa, whose blog Sugarjet is really funny to read and fun to look at!

heart stole


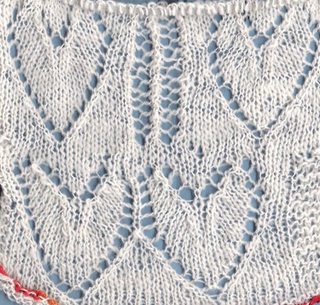
Here's a close up of the heart stole. It's not finished, so it's not blocked. It'll be quite lacy looking when it's blocked. I'm planning on putting a wide scalloped border on the whole thing.

Click on picture to see the true beauty of this heathered yarn!

purple heart swatch


Here's my second (third, fourth, fifth?) swatch of hearts. The purl line in the middle of the diamond was my picking up the stitches from the original provisional cast-on.

I went on to put eyelets inside the hearts which makes them more airy (obviously) and less hard edge looking.

Unfortunately, this beautiful shetland wool smells pretty awful and I suspect it gives me a headache. I bought it at Webs from their huge back room. It was a bargain at 11/lb. However, it's musty as hell. And now that the weather is warm and humid, its' aroma has become almost overpowering.

As I mentioned earlier, I'm working on a stole, but I've had to put it aside because it stinks. Never had that problem before!

just one of many heart swatches


This is one of my swatches. I was trying to figure out how to make a nicer looking heart than any pattern I had tried before. This swatch is not "succesful" but I thought I'd put it online so you can see my process. This is not a blocked piece. What a mess, but I sure learned a lot! I finally figured out that hearts look much nicer when you knit them upside down. I'll get a picture of that up soon. I'm nearing the end of making a heathered purple stole with a heart and fagot design.

The hearts are patterned every other row. The fagotting between them is patterned on every row. I just adore fagotting!

I wonder if I'll ever finish the stole. Truth is, I much prefer making swatches and playing around with patterns than making a "product". I've got so many abandoned projects!

shetland lace swatch


Here's a small swatch of "true" Shetland Lace. Shetland lace is created using a garter stitch ground, which is knitted every row. I purl every row, because I prefer purling. This design is also patterened every row, which produces a very airy lace. It's been blocked. They look like hell beforehand. This one is a bit of a mess even tho' it's blocked. I think the small swatches are not very impressive; it's only when these designs are incorporated into a large piece of work, such as a shawl, that they become beautiful. The garter stitch ground is inherently messy and and as is traditional, for speed, there is no differentiation between right, left and center leaning decreases. All are just k2tog (or p2tog). If you don't know about knitting, you're probably horribly bored and confused right about now, aren't you?

ruskin lace work


I did this piece a few years back. The photo does not capture the details well. I am new to digital cameras.

This is "Ruskin Lace". Here's a link to the Ruskin Lace Museum if you'd like to know more about it.

I'm planning on starting a new piece this week and timing myself. Not to become any faster, but to find out how much time it actually takes to make one of these 3" by 3" squares. Needless to say, it is labor intensive.